Thanks Julie for this great Tutorial!
Hi everyone, I'm going to go through paper-piecing with you in pics. Hopefully it'll help those of you who haven't tried this before. There are different ways of doing this technique, but I'm just going to show the way I do it.
Hi everyone, I'm going to go through paper-piecing with you in pics. Hopefully it'll help those of you who haven't tried this before. There are different ways of doing this technique, but I'm just going to show the way I do it.
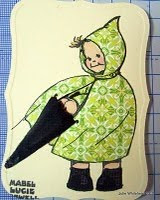
Firstly, choose the papers you are going to use and the image. Make sure that the image is easy to cut out. I'm using BasicGrey Origins and a stamp by Mabel Lucie Attwell. I use the same paper for paper piecing that I'm going to use in the background, as I think it makes the paper piecing 'pop' more.
Stamp your main image first, then ink up your stamp again and stamp on the other papers. You don't need to restamp the whole image, only the bits you're going to be using. (I only need the umbrella and shoes on the darker paper so I haven't worried about the top of the image).
Next, cut out the pieces, try not to undercut them or they won't cover your image.
Colour the parts of the image that aren't going to be paper pieced like the skin.
To get dimension, turn the piece over and use an embossing tool round the edges on a mat to make the image curl in a little.
Add the first layer to the image. I've flattened the sleeves but given the coat some 'lift' with silicone glue. (it's better to use a wet glue as you can move it around to get it in exactly the right place).
Then add the other pieces. I've made the shoes flat, but the umbrella is curled round as an umbrella would be.
I've added black diamond Stickles to the umbrella and socks to make them stand out a bit more. Put aside to dry while you put your card together. Once dry, add to card. See finished card below.
That's all there is to it!


